Sunday, January 29, 2012

Hair Ornaments

I have always had a fondness for wearing things in my hair. Even on days when I'm dressed monochromatically, a plumeria or an ornament of some sort will always be in my hair. I recently bought some more new hair ornaments, and I really like them. :D
Thank God for etsy, I got all this stuff for $10 (plus shipping). Among them was this white poinsettia:
I like how it's white with a little cream, and it opens flat against my head too. Then, I got a little spider friend!
You can't really tell, but he is covered in black glitter all over. He's so cute! Going back to flowers, I bought this blood red poinsettia. It adds a nice splash of color, and looks great in my black hair.
 And just for fun, I bought this skeleton hand. I've always had a fondness for bones, and this is plain enough that I can layer it with my other hair ornaments too.
I also make my own hair ornaments as well. As we all know, I look like this mostly every given day of my dark, tormented existence:
You can kind of see my self-made hair ornament sticking out of my head.
 It looks like this. It actually was a leather necklace with that round thing as a pendant. It was nice, but I like to give things other uses that what it's actually for, thus this hair ornament was invented.
 Here's a photo of it with flash so you can see how it flows with my hair. I love peacock feathers.
I had recently bought this little fascinator cap with a veil the other day as well. It has this big black bow in the back which I feel like ripping off, but it can stay for now.
Just to add interest to it, you can see my little spider friend hanging out with me.
Keep it goth, keep it classy. :D <3!

Saturday, January 28, 2012

Attempted Hair Styles

Hello again! Sorry for the lack of posts, I started school and things have been stressful. Blah, blah, here are some hair attempts I made! It all started with this choker I bought.

It's black rubber with adjustable spikes. I have a thin neck (just under 13 inches, my hands can go around my neck and my fingers overlap) and I like to wear necklaces or else I feel naked. ^^;
It looks like this. You can pop any of the rubber spikes out and adjust it to your neck. Then you overlap the spikes in the holes like this:
 And pop them into place.
 Voila! It came with a matching bracelet too. :3
Given that I have arse-length hair, I had to think of some hairstyles that would show off my necklace and still be practical. I started with this one:
It's just a plain, classy half-up 'do, and I realized I actually like it a lot. Next came the pigtails!
 I learned this little trick today. Get two hair clips like this:
And, pulling your pigtail up, pin it just above where you originally tied off your hair, like this:
 and let the ends spill down over it, covering all the clip with your hair.
Then it'll make your pigtail s look like this! I like them better like this. :3
Also, this is the way I tie my pigtails. I have long, heavy hair, and just a plain rubberband is, not only damaging to my hair, but also too weak to hold it up. So I developed this method:
It's just a rubberless rubberband with two bobby pins on each side. Then, I grab my hair like this:
Slip one of the bobbypins in the middle of the pigtail between your fist and your scalp:
 Wind the rubberband around your pigtail as much as it will go:
 Then slip the other bobbypin into your pigtail, like this:
And that is it, your pigtails will last ALL. DAY. There's a regular pigtail on the right of this bottom photo, and a hairclipped pigtail on the left. I prefer the left one.
Another hairstyle I tried was braided pigtails. I feel like these look too... blah on me. But with pink or blue hair, it looks SOO awesome.
One thing I choose to do is to gently pull some hair out of the top-back side of each pigtail.
 It adds height and lift to my hair, and I think it looks better than my plain, flat hair.
 Same on the other side.
 So with the hair poufed out, I look like this. Think Mary Ann from Gilligan's Island.
 Then inspiration struck.
 I decided to undo the braids, I think I look best with low pigtails like this.
With these, my hair is pulled back. You can see my face, but it's still around my face and has movement to it.
 This way, my neck doesn't feel to naked. Like wearing a scarf of dead proteins. :D
 I HATE this last hairstyle actually, I think I look horrible with ponytails.
 You can even see the distaste in my eyes, I look like a cheerleader from hell...
My next hairstyle was a bun. I ALWAYS use these for buns. With hair as long as mine, these two, TWO, hairpins hold my hair perfectly in place without it ever budging. These are seriously better than bobbypins for buns. TRUST. ME.
 Obvious snooty face.
 I like my French twist, but it needs a little more. I decided to add some ornaments.
 All-in-all, the top hat won. Gotta keep it classy.
How about you? Do you do your hair? Do you have dread locks? Are you bald? Do you live exclusively on pigtails? Let me know! <3!

Monday, January 2, 2012

DIY Coffin Coin Purse

Ah, the new year- the death to a year and the start of change. Death. Change. Death change... Coffin coin purse!
Yup, that right there was my logic.

This project will come in two parts: the first will be my own attempt at a pattern tutorial (which you may or may not choose to use), and the second will be the coffin coin purse tutorial. Okay, now for the boring pattern tutorial.

You will need: a piece of paper, a ruler, a pencil, scissors, and patience. For my coffin, I measured out a box on the paper that was 18cm and 12.5 cm (Don't worry about the other markings, just focus on the red marker and make a rectangular box shape).
On the 12.5cm marking, mark the midway point which will be approx 6.5cm in from either side. Do the same at the other side of the box too.
Connect those marks and make a long vertical line going all the way up and down the box, like this:
Next, measure 6cm's down from the top of the coffin. Make several marks and conjoin them. Draw a line from side to side to connect the marks so it looks like this:
So now, there is a cross in the middle of the box you drew earlier. It should look something like this:
See? Super easy. Now, at the top of the "cross", make a mark 3cm on either side so it looks like this:
The same thing with the bottom of the "cross", make two 3cm markings like this:
Now, conjoin the marking on the left side to the left "arm" of the cross so you have a line like this:
The same with the bottom, join the left "arm" to the bottom 3cm marking we just made so it looks like this:
Do the same with the other side and you'll now have something resembling a coffin.
Cut it out with your scissors.
Flip it over to the plain side so there are no markings showing. This is going to be your main pattern piece for this project, so if you want wider "arms" or a longer coffin, make your alterations NOW. Otherwise, this will be your pattern.

Okay, now that we have our initial coffin pattern, let's get on with the sewing! You will need: two contrasting patterns of fabric, a zipper, scissors, pins, and a sewing machine (or some calloused fingers to sew it by hand). And, of course, your newly made coffin pattern piece.
Remember, this will be a coin purse. You probably want sturdier fabrics for this project, or at least a sturdy outside and a fancy satin lining for the inside. This was my first time making one, so I chose two fun yet sturdy fabrics. That way, you can see the inside (checkered black and white fabric) and the outside shell (black with grey swirls).
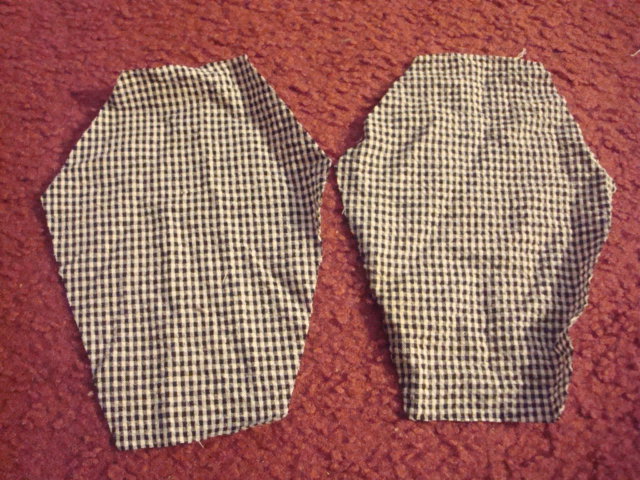
Fold your fabric in half and pin your pattern piece down on the fabric like this (or tape it down if you like). Leave room on the edges for seam allowance.
You should now have two similar pieces like this:
 Repeat the same for the other fabric.
 Voila!
Wrong sides together, pin one of the lining fabrics and one of the shell fabrics together. I decided to make my coffin messy and just sewed them together like this, but you can tuck your edges in for a nice, clean look if you choose.
Repeat for the other two pieces, you should now have two of these:
Open your zipper and pin it in place. You want it to go about 1/2 to 3/4 the way around.
Sew it into place. The zipper might look upside down, but once I flip the zipper over (like this below) and sew the other side of the zipper to my other coffin piece, it'll all line up properly.
Now that you've sewed your zipper to one side of the coffin, it'll look something like this:
Sew the other side of the zipper to the other side of the coffin, making sure that both pieces line up properly.
Flip it inside out and there it is, your own spooky coin purse!
I decided mine looked too plain and nice, so I added a zig-zag stitch to the inside rim of the zipper so it looks like this:
The inside lining looks good with the red stitching too. It looks hungry... for change!
Not too bad for my first time. It took me like 3 hours to make, but because I was altering my pattern and unstitching things I sewed improperly, etc. I doubt it'll take anyone following my perfectionist steps too long to make this little coin purse.

I hope you like this tutorial, now go spread some spooky change for 2012! <3!