Monday, August 27, 2012

Quick Update

For those of you who didn't know, I was VERY sick this past week. I posted some videos on YouTube, but couldn't sit upright long enough to post a blog at my computer. As you can see, I'm feeling MUCH better now and even went to a buffet with my family for my brother's birthday this weekend. 
I was still afraid to eat any real food though. You can tell by looking at my family's plates and my own plate. 
 Afterwards, I went to the market with my mom to get a few essential items. 
 No, we didn't buy a tentacle, but I kind of wanted to. ... because... of reasons.
Later on, I went to the doctor to get a check up and was deemed "healthy". These were her instructions. Wanna know the truly crazy part? ... she never prescribed me any medication of any sort. She even told me to STOP taking Excedrin for the horrific migraines I was having. Thanks doc!
And this is me in a nutshell. I don't know how they got my height, weight or BMI or BSA. They didn't measure those when I came in. They probably just went off of my old records or something because, after a week of headaches, nausea, and diarrhea, I KNOW i was not 139lbs. 
Alas, a hospital snack was had! It was 4 o'clock which is time for tea, but I'm afraid Snapple was all I could find.
 This muffin was strangely delicious though. Like "Omg-there's-crack-in-this!!!!" delicious.
 Of course, Vladimir helped. He was hiding from the sun behind my Snapple bottle. <3!

Monday, August 20, 2012

Fixed bodice!

I have had this bodice for some time now, but there is only one problem... 
 Look at that busk!
 Most of the pins were missing, as you can see here. There was only one peg on the bottom, and even that one felt a little wobbly. I didn't know what to do with this bodice, but I liked it too much to throw it away. I decided it needed to be saved!
 I turned it inside out and looked at the busk, the part with the missing pegs.
 I located the bottom of the busk...
 And started seam ripping that sucker out.
 THIS is the busk that was supporting my bodice. It looks awful! I'm so glad I took it out.
 I located the bottom on the other side of my bodice and started seam ripping it as well.
 This side was still intact, but it was morphed from age and use. That was thrown away as well.
 I measured out the busk and bought a zipper of the same length.
 I put it in place and pinned that zipper down.
 The top DOES meet properly as you can see in this photo. I think the fabric just was out of shape because of the way it was pinned.
That was it! My bodice was saved! I'm soo glad too, I really liked this one- the pink and the black with hearts made me feel like a cupcake. All hail up-cycling Goth garments! <3!

Sunday, August 19, 2012

Girls Night Out

 Girls night out! My little Goth-a-billy cupcake was driving.
 She looks so majestic in the setting sun. :3
We arrived at the Anarchy Library after some make-up application at a MAC store. You gotta love free make-up. Natalie with my little Hollie-bear making kissy faces at me.
 I always look a little boozy in photos with friends. I can never look normal or just... "smile". O.o
 Our drinks, cranberry juice FTW!
 Okay, so I ordered it because it matched my outfit. I'm kinda vain like that. 
 The restroom had fuzzy leopard print walls! I was kinda afraid to touch them though. ^^;
 And here's the group shot. We're all so different, but we're all so alike.
I went to school with these lovely ladies. We're all going our separate ways, but imma miss them. Summer is ending waaay too fast. ><! <3!

Friday, August 17, 2012

Outfit of the day- Captain Jolie Rouge

I was reading "The Asylum For Wayward Victorian Girls" today, and I have always taken to the character Captain Jolie Rouge. 
 Chris and I were going to Huntington Beach to walk around, have dinner, and watch a movie, so I thought it fitting to dress nautically. X3
 Nothing too special, it is still entirely too hot to wear much clothes or make-up as I normally do. But I think my tri-corner hat does the trick.
 If you go quickly between these two photos, it looks like I'm rinsing out my mouth with mouthwash. ^o^!
Lots of sunscreen was donned (It was about 4pm, look at the hot mess of a sun behind me). My big black parasol was donned as well, people seem to be afraid of it for some reason. Like it is a bringer of death and doom. Wonder why... <3!

Thursday, August 16, 2012

DIY Gothic tea bags

I was online last night and I realized something- I can MAKE my own Gothic tea bags! 
As a girl who likes to personalize everything, this will be a useful little tool. I have some loose leaf teas just sitting around because I don't like my tea ball. Not anymore! You will need: a coffee filter, scissors, a stapler, and the tea in question. 
 Optional: embroidery floss or a small bit of ribbon, and cut out designs of Gothic stuff.
First, cut the filter into a rectangle shape. Just trim the frilly outer portion of the filter, like this.
Next, scoop your tea in the middle of the filter. Divide it into two piles with some space in between them, like this.
Now, fold over the sides of the filter onto your tea. Try to make the sides overlap so, when your tea bag expands in the water, tea doesn't spill out everywhere.
Using the space between the tea piles as a guide, flip the filter up so it looks like this.
 Using your fingers as a guide, cut the filter above your fingers. Leave some room, you want your tea to be able to breathe a little. And as always, it's best to OVER cut than to UNDER cut and ruin the whole bag.
With those snippets cut off, fold the top of the tea bag down. First do one side like this, then the other side so you have a pointed tip at the end.
Using your stapler, staple this little fold down in place. Voila! Your own tea bag! You can just pop this in some hot water and fish it out with your spoon when it's done. OR, you can follow these extra steps to personalize them.
 Remember those tools I posted earlier, the optional ones? Yeah, you're gonna need those now. Use embroidery thread because it's thicker and can "take the heat" as it won't slip out of the staple. I usually have a few extra ends of ribbon like this red piece here, so I decided to use that.
Remember that fold we made in the tea bag just before we stapled it? Tuck your thread/ribbon underneath that fold and pull it over. Staple it down. This way, it is stapled both underneath and over the top of the tea bag.
Taking your other end of string/ribbon, staple whatever design you choose to it. A bat, a coffin, a heart, a cupcake, whatever. Just cut it out of paper (I chose a magazine cover, glossy and sturdy) and staple it down to the other side of the string.
 And there you have it, your very own personalized Gothic tea bags! They're hot!
I hope you guys enjoyed this little tutorial, it's time for tea! <3!

Wednesday, August 15, 2012

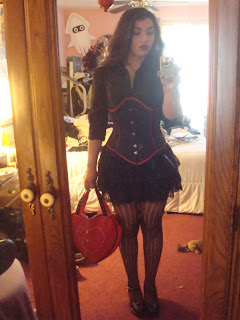
Outfit of the Day- Mom's B-day

It was my mum's birthday a little while back, and this was the outfit I wore. 
 This entire outfit was entire assembled to showcase these new hose.
They're so cute, and they make my legs look pretty long. I'm wearing some high heels with these too, so I'm pretty sure those helped.
It's been really hot this summer, I miss the days when I would wear my corsets without dying as soon as I opened the front door.
 Minimal make-up too these days. With said heat, any excessive make-up is immediately a sweaty mess running down my face. Autumn cannot come fast enough. ><! <3!