I found this little bobbit on etsy and it was what inspired this tutorial in the first place.
It's a slide of some sort. I didn't (and still don't) know what it's for, I just knew that I wanted it and that I was determined to make something of it.
So! With that in mind, I made this tutorial for those who have a slide like this one
AND for those who do not. It
CAN be done without this little slide, so read on. You will need: ribbon, a lighter and scissors.
Measure out the ribbon to your desired length and cut it. I always OVER measure my ribbon because it's easier to trim a ribbon than to try to make it longer. I measured mine out 42 inches and cut it. Next, light your lighter and lightly burn the edges of your ribbon.
This will make the fabric curl in on itself and it will NOT fray. Seriously. Like, ever. The ribbon might light on fire if you hold it too long, but it WILL NOT burn so fast that you can't lick your fingers and pinch it out. So never fear!
Now, drape the ribbon over the back of your hand like this. It should be pulled so that each side has an even length of ribbon.
Now, get the right side of the ribbon and pull it under your hand and over onto the left side of your hand. Basically, act as if you are wrapping the right side of the ribbon around your wrist but, instead of wrapping it around your wrist, tuck the ribbon between your thumb and index finger, like this.
Pull it taunt (don't cut off your circulation, no one likes blue hands) and hold it safely between your fingers like this.
Do the exact same with the left side of the ribbon. Bring it across the palm of your hand, bring it up the right side of your hand, and place the ribbon between your pinky and ring finger.
Pull it taunt, you now should have an X on the back of your hand like this with the two ends of ribbon dangling from between your fingers to the palm of your hand.
Take your ribbons like this, and tie them into a knot.
Like this, leaving the ends dangling down.
And there you have it- a very simple yet elegant bracelet made out of ribbon.
I assure you, this looks much better when your nails aren't all chipped. >,<
Easy, right? It adds a small bit of interest to any outfit, and I like to do this when I'm dressed like a Victorian whore. :3
Now, for those of you who have a slider thingy, this is how you can do the same with the slide.
Take the ribbon and pull it through each side of the slide.
Push the slide down so you have a loop behind it, like this.
Slip your wrist through that look and position the slide so it rests on the back of your hand, the ribbon with equal slack on each side.
Do the same as before, pull the right side of the ribbon across your palm and over the left side of your hand, placing that ribbon between your thumb and index finger.
Pull it secure.
Repeat with the other side of the ribbon. Take the left side, pull it across your palm, bring it up the right side of your hand, and tuck it between your pinky and ring finger.
Pull it taunt so you have an X on the back of your hand.
Take the ribbons in your palm
And tie them together.
Voila! Now you have a FANCY ribbon bracelet all your own.
Again, looks fancier with painted nails. :p
Now, here is one more variation of the slider that makes it into a necklace. Again, the same long length of ribbon is used. Pull the ribbon through the sides of the slider.
You now have that loop behind the slide, like this.
Now, slip your head through that loop. Your ribbon is long, so it ought to fit around your head and neck, like this.
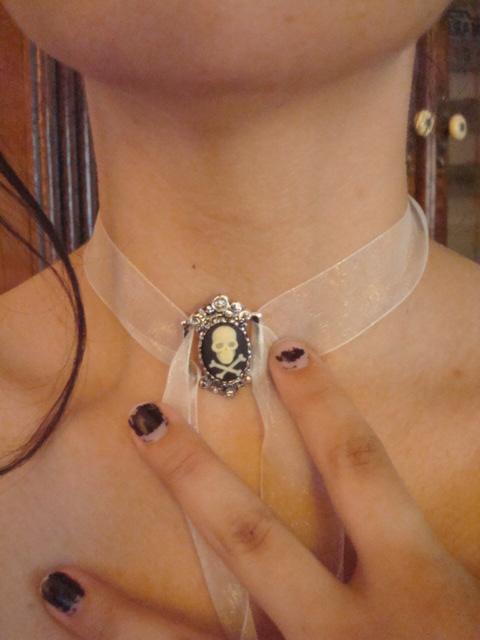
Push the slider against the base of your throat, or wherever you would like it positioned.
And pull the ribbons to the side, right side to the right, left side to the left.
And pull them behind your neck.
Tie the ribbon into a know, I prefer a bow so that I can easily take it off later on or adjust it throughout the day.
And there you have it, a slider/choker/ribbon necklace thingy!
It's really simple to do, and I really like how I can alter this little slide. I had no idea when I bought it how I would use it until I played with it a bit. Hope you like it! <3!


No comments:
Post a Comment